
The Easiest Keto Garlic Breadsticks Recipe

Jump to...
Introduction
I had always wanted a keto version of the Olive Garden breadsticks everyone raves about. So when I was flipping through Maya’s cookbook and came across her Easy Keto Breadsticks, it caught my attention straight away. I tried it, and it did not disappoint — soft, airy, and tasting mostly of garlic butter, which is all I really wanted from a breadstick in the first place.
Although these breadsticks are great on their own, you can serve them alongside a soup, stew, or salad on the side. The dough comes together in a stand mixer in about ten minutes, but it then chills for thirty before you shape it, so plan on about an hour from starting to pulling them out of the oven.
Gathering Must-Have Ingredients
Three cups of shredded mozzarella and four tablespoons of cubed cream cheese are the body of this dough. They go into the microwave together for ninety seconds and come out as one stretchy mass — shred the mozzarella and cube the cream cheese before they go in.
Four beaten eggs, two thirds of a cup of coconut flour, a tablespoon of baking powder and a teaspoon of garlic powder all get kneaded into that while it is still warm. Coconut flour is the only flour in the recipe, and two thirds of a cup of it goes in against three cups of cheese. That makes this the coconut-flour version of fathead dough rather than the more common almond-flour one. Then the whole thing chills for thirty minutes. That is the part you cannot skip: chilling firms the cheese back up, and a warm dough will not hold a log shape or keep it in the oven.
The last three arrive after shaping. A tablespoon of melted butter goes over the tops, and then the Italian seasoning and a teaspoon of coarse sea salt go over the butter, before the tray goes in.
Low Carb Keto Italian Garlic Breadsticks
Ingredients
All Ingredients
- 3 cups mozzarella cheese, shredded
- 4 tbsp cream cheese, cut into cubes
- 4x large egg, beaten
- ⅔ cup coconut flour
- 1 tbsp baking powder
- 1 tsp garlic powder
- 1 tbsp butter, unsalted, melted
- 1 tsp Italian seasoning
- 1 tsp sea salt, coarse
Nutrition Facts
8 servings per recipe| Per Serving 230 | Per Recipe 1830 | |||
| 3 cups of mozzarella cheese | 120 | 960 | ||
| 4 tbsp of cream cheese | 25 | 200 | ||
| 4x large egg | 30 | 240 | ||
| ⅔ cup of coconut flour | 40.02 | 320.16 | ||
| 1 tsp of garlic powder | 1.13 | 9 | ||
| 1 tbsp of butter, unsalted | 12.5 | 100 | ||
| 1 tsp of Italian seasoning | 0.5 | 4 | ||
| 16g | 21% | 130g | 166% | |
| 3 cups of mozzarella cheese | 9 g | 72 g | ||
| 4 tbsp of cream cheese | 2.5 g | 20 g | ||
| 4x large egg | 2 g | 16 g | ||
| ⅔ cup of coconut flour | 1.33 g | 10.67 g | ||
| 1 tbsp of butter, unsalted | 1.38 g | 11 g | ||
| 1 tsp of Italian seasoning | 0.01 g | 0.1 g | ||
| 10g | 49% | 78g | 388% | |
| 3 cups of mozzarella cheese | 5.25 g | 42 g | ||
| 4 tbsp of cream cheese | 1.5 g | 12 g | ||
| 4x large egg | 0.75 g | 6 g | ||
| ⅔ cup of coconut flour | 1.33 g | 10.67 g | ||
| 1 tbsp of butter, unsalted | 0.88 g | 7 g | ||
| Trans Fat | 0g | 0% | 0g | 0% |
| 139mg | 46% | 1110mg | 370% | |
| 3 cups of mozzarella cheese | 22.5 mg | 180 mg | ||
| 4 tbsp of cream cheese | 7.5 mg | 60 mg | ||
| 4x large egg | 105 mg | 840 mg | ||
| 1 tbsp of butter, unsalted | 3.75 mg | 30 mg | ||
| 830mg | 36% | 6650mg | 289% | |
| 3 cups of mozzarella cheese | 225 mg | 1800 mg | ||
| 4 tbsp of cream cheese | 27.5 mg | 220 mg | ||
| 4x large egg | 35 mg | 280 mg | ||
| ⅔ cup of coconut flour | 18.68 mg | 149.41 mg | ||
| 1 tbsp of baking powder | 240 mg | 1920.01 mg | ||
| 1 tsp of garlic powder | 0.13 mg | 1 mg | ||
| 1 tsp of Italian seasoning | 0.13 mg | 1 mg | ||
| 1 tsp of sea salt, coarse | 285 mg | 2280 mg | ||
| 8g | 3% | 63g | 23% | |
| 3 cups of mozzarella cheese | 1.5 g | 12 g | ||
| 4 tbsp of cream cheese | 0.25 g | 2 g | ||
| 4x large egg | 0.5 g | 3.96 g | ||
| ⅔ cup of coconut flour | 5.34 g | 42.69 g | ||
| 1 tsp of garlic powder | 0.25 g | 2 g | ||
| 1 tsp of Italian seasoning | 0.09 g | 0.7 g | ||
| 4g | 15% | 33g | 117% | |
| ⅔ cup of coconut flour | 4 g | 32.02 g | ||
| 1 tsp of garlic powder | 0.04 g | 0.3 g | ||
| 1 tsp of Italian seasoning | 0.05 g | 0.4 g | ||
| 1g | 7g | |||
| 4 tbsp of cream cheese | 0.25 g | 2 g | ||
| ⅔ cup of coconut flour | 0.67 g | 5.34 g | ||
| 1 tsp of garlic powder | 0.01 g | 0.1 g | ||
| Sugar Alcohols | 0g | 0% | 0g | 0% |
| Allulose | 0g | 0% | 0g | 0% |
| 4g | 31g | |||
| 3 cups of mozzarella cheese | 1.5 g | 12 g | ||
| 4 tbsp of cream cheese | 0.25 g | 2 g | ||
| 4x large egg | 0.5 g | 3.96 g | ||
| ⅔ cup of coconut flour | 1.33 g | 10.67 g | ||
| 1 tsp of garlic powder | 0.21 g | 1.7 g | ||
| 1 tsp of Italian seasoning | 0.04 g | 0.3 g | ||
| 15g | 31% | 123g | 247% | |
| 3 cups of mozzarella cheese | 10.5 g | 84 g | ||
| 4 tbsp of cream cheese | 0.5 g | 4 g | ||
| 4x large egg | 3 g | 24 g | ||
| ⅔ cup of coconut flour | 1.33 g | 10.67 g | ||
| 1 tsp of garlic powder | 0.06 g | 0.5 g | ||
| 1 tsp of Italian seasoning | 0.01 g | 0.1 g | ||
About these numbers: We are home cooks, not certified nutritionists. Nutrition is shared as a courtesy. We pick a representative product for each ingredient, and our recipe system works out the totals from the amounts in this recipe, so please treat them as a helpful estimate rather than a guarantee. The brands you buy, any swaps you make, and how generously you portion the recipe will all move these numbers.
Directions
-
Preheat The Oven To 350F.
Preheat your oven before you start baking. As a result, the oven will reach the proper temperature when you are ready to bake. You will also have better results because it evens the temperature throughout the bake.
-
Combine The Cheeses And Microwave.
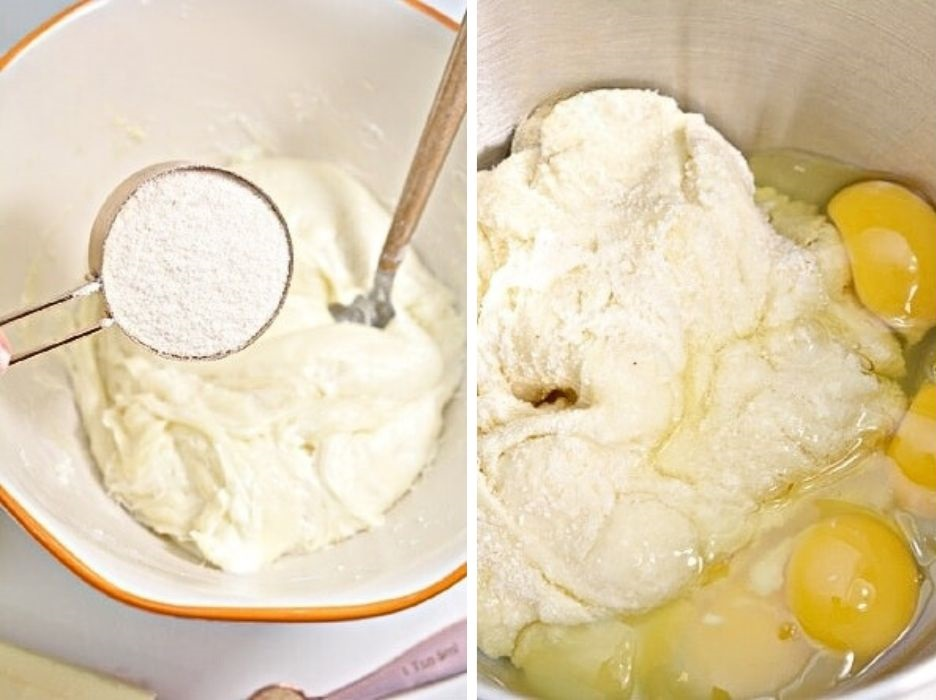
Mix the shredded mozzarella and cream cheese in a large bowl. Microwave the cheese mixture for 90 seconds to get the perfect consistency. Stir halfway to ensure even melting and mix well at the end. These two melt together to form a stretchy, flavorful base for your breadsticks.
-
Add Other Ingredients To Form The Dough.
Stir in the beaten eggs, garlic powder, baking powder, and coconut flour. These ingredients are mixed in to form the perfect keto dough. Knead well using a stand mixer or your hands. You can microwave the dough for 10-15 seconds if it becomes hard before it is fully mixed. Chill the keto dough for 30 minutes to make it easy to shape.
-
-
Shape The Dough.
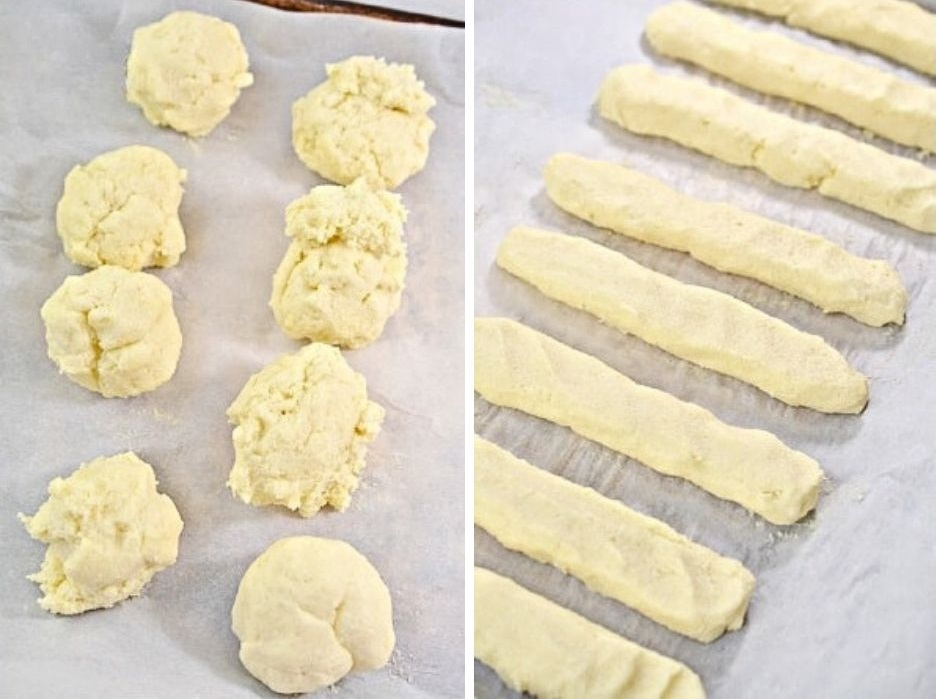
Divide your keto dough into 8 portions to give you evenly sized garlic breadsticks. Shape each portion into a log about 1 inch thick and 6-7 inches long. For best results, oil your hands. Then, slightly flatten the breadsticks and place each one 2 inches apart on the lined baking sheet.
-
-
Prepare The Butter And Seasoning.
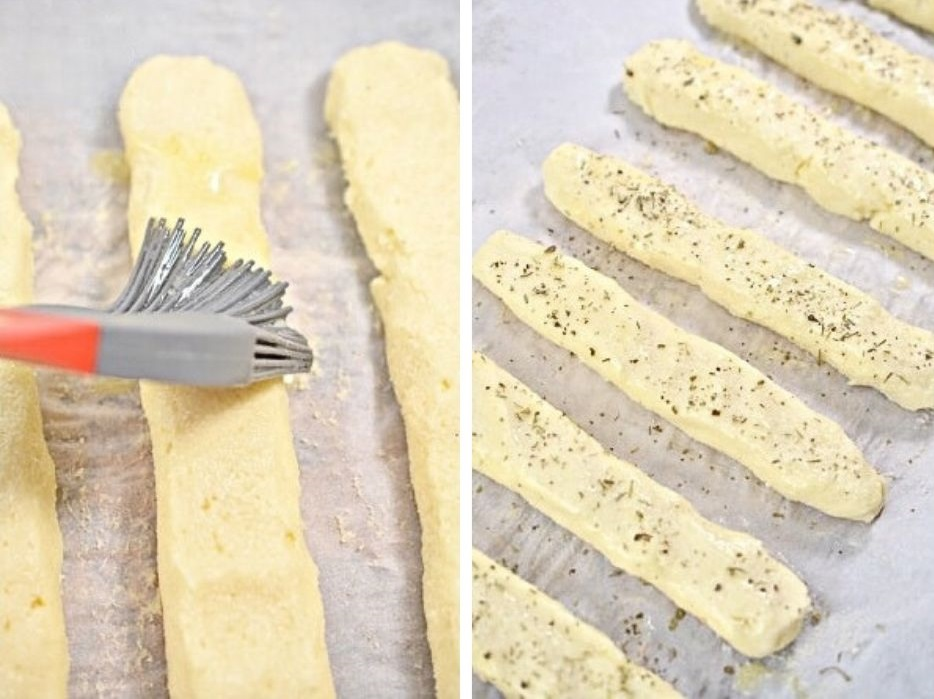
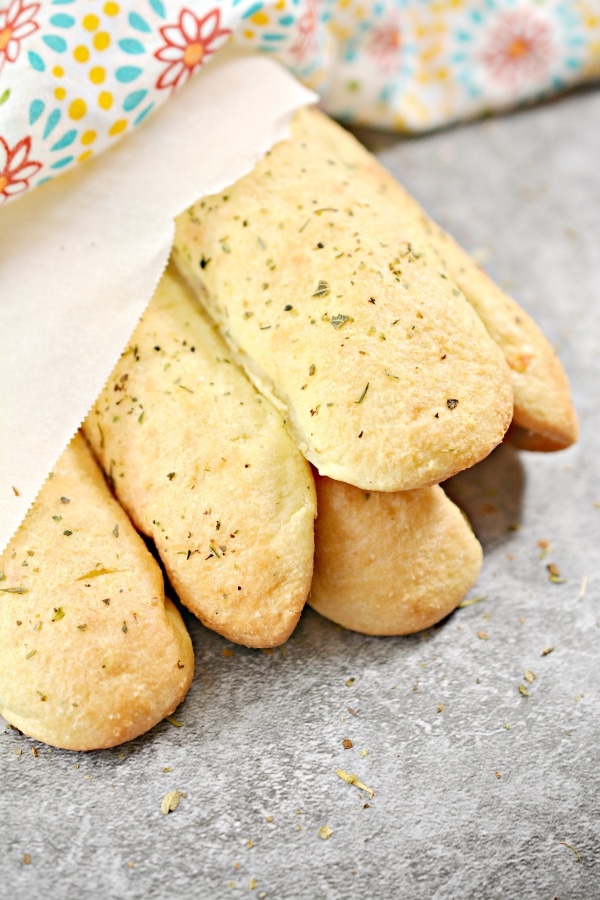
Brush the upper portions of the logs with melted butter. This gives the breadsticks a brown finish and turns crispy on the outside. Sprinkle the Italian seasoning and sea salt for a flavor-packed crust.
-
-
Bake Until Golden Brown.
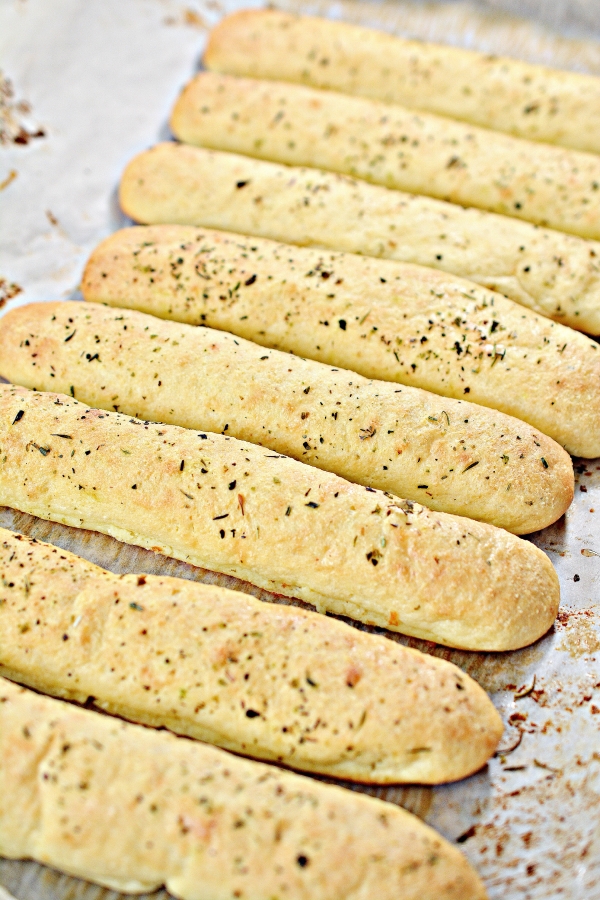
Bake the garlic breadsticks for 18 to 22 minutes - the perfect time for your breadsticks to bake until they turn a golden brown color and are ready to enjoy.
-
Notes
Recipe from Wholesome Yum Easy Keto Cookbook
Preparation
- Parallel Steps: While the dough chills, you can melt the butter and prepare the seasoning mixture.
- Easy Cleanup: Line your baking sheet with your parchment paper for quick and easy cleanup.
- Cheese Preparation: Shred the mozzarella cheese and cut the cream cheese into cubes before you start to make the mixing process smoother.
- Room Temperature Ingredients: Have the eggs and cream cheese at room temperature for a more creamy consistency.
- Chill the Dough: Cooling the dough in the refrigerator for at least 30 minutes helps shape the breadsticks without sticking to your hands.
- Watch the Oven: Keep an eye on the breadsticks during the last minutes of baking. You want them golden brown, not burnt!
Storage
The keto garlic breadsticks can be stored well if not consumed immediately or if there are any leftovers. Let them cool completely and store them in a tight container or a plastic bag. Then you can do the following:
- Refrigerate: These are mostly mozzarella, cream cheese and egg, so they do not keep on the counter the way flour breadsticks would. Store your keto garlic breadsticks in a tight container in the refrigerator if not consumed immediately or if there are any leftovers. They should last for up to 3 days.
- Freeze: You can freeze the keto breadsticks. Wrap the breadsticks individually in foil or plastic wrap. They last for up to 2 months in the freezer.
- Reheat: The best way to reheat garlic breadsticks is in a preheated oven at 350F for about 10 minutes. Or, reheat them in the microwave, but be careful not to overcook them so as not to make them dry.
- Storing the Keto Fathead Dough: If you want to make the garlic dough ahead of time, you can wrap it in tight plastic wrap and refrigerate it for up to a day.
Serving Suggestions
- Serving Size: Each breadstick is a generous serving. Cut them in half if you prefer smaller portions.
- Pairing: These low-carb breadsticks pair perfectly with low-carb marinara sauce or as a side to keto soup, salad, or any other hearty meal.
- Garnish: This keto breadsticks recipe is already perfect, but you can add other keto garnishes to your liking. A few handfuls of fresh parsley or grated parmesan cheese can add a touch of freshness and flavor.
- Dipping Sauces: Serve with marinara sauce or olive oil infused with minced garlic for dipping.
Frequently Asked Questions
Can I make use of almond flour instead of coconut flour?
You can use almond flour, but it may change the texture slightly. You will need to adjust the quantity as almond flour tends to absorb less moisture compared to coconut flour.
Can I make the dough ahead of time and bake the keto breadsticks later?
You can prepare the fathead dough ahead of time to reduce prep time. Refrigerate and cover it for up to a day. When you’re ready to bake, shape the breadsticks and follow the baking instructions.
Are breadsticks the same as bread?
Breadsticks are not the same as bread, although they share some common ingredients and methods of preparation. Here’s how they differ:
Shape and Size: Breadsticks are long, thin, and crunchy. They’re shaped into individual sticks, whereas bread is usually baked in loaves or rolls.
Texture: Breadsticks are crisp and have a firmer bite. Bread tends to be softer and more pliable. However, breadsticks’ texture can vary, and some may be softer, resembling bread in texture.
Ingredients: While both bread and breadsticks contain flour, water, yeast, and salt, breadsticks include additional flavoring ingredients such as garlic, butter, or herbs. The flour type and ingredient proportions also differ, resulting in flavor and texture variations.
Purpose: Bread is a staple food that can be used for sandwiches, toast, or as a side to a variety of meals. Breadsticks, on the other hand, are served as a snack or appetizer and are commonly paired with dips or soups.
How do I know if my dough is properly kneaded?
It should feel tacky but not so sticky that it sticks to your hands or counter. And the dough should stretch without immediately tearing. You can also try to poke the dough with your finger, and if it slowly bounces back, it’s ready.
Why is chilling the dough for 30 minutes necessary?
Chilling the dough allows the keto bread to be easier to shape and handle. It helps firm up the cheese and helps the breadsticks hold their shape while baking.
What should I do if the dough becomes hard before fully mixed?
If the dough becomes hard while mixing, microwave it for 10-15 seconds to soften it. This will make it easier to knead and shape.
Is this recipe gluten-free?
Yes. This recipe uses coconut flour instead of wheat flour, so none of the ingredients contain gluten. Always check your ingredients’ labels to confirm they don’t contain any hidden gluten.
Wrap Up
What I love most about these is that there is hardly a meal they look out of place beside. They come out of the oven warm and savory and taste like the breadsticks they are standing in for, which was the whole job.
Have you tried this recipe or any other low-carb recipes on the blog? Please rate it below and let us know what you think in the comments! I always love hearing from you!
You can also share a snap of your garlic breadsticks on Instagram and use the hashtag #buttertogetherkitchen. We’re always excited to feature you on our page!
Enjoy!
Correction — October 4, 2026: Leftover breadsticks belong in the refrigerator, where they keep for up to three days, or in the freezer. This cheese-and-egg dough should not be stored at room temperature.
More Keto Recipes You'll Love
-

Air Fryer Keto Chicken Nuggets: The Easiest Version
Appetizers & Sides, Lunch & Dinner January 7, 2020 -

Cheesy Keto Garlic Bread
Appetizers & Sides, Lunch & Dinner March 16, 2019 -

Garlic Parmesan Keto Pretzels
Appetizers & Sides, Lunch & Dinner February 27, 2019 -

Keto Pepperoni Pizza Pretzels
Appetizers & Sides, Lunch & Dinner October 28, 2021